

Easily Manage Your Email Marketing Campaigns with Klaviyo’s CMS on WordPress.

Klaviyo is a powerful email marketing tool, but integrating it with your WordPress site can seem daunting. Don’t worry! This guide will walk you through five simple steps to integrate Klaviyo with WordPress and ensure your email marketing runs seamlessly. Whether using Elementor or a different WordPress builder, this guide will get you started.
Seamless Email Marketing: Klaviyo allows you to manage powerful email marketing campaigns directly from your WordPress website, making it easier to build customer relationships.
Advanced Segmentation: With Klaviyo’s CMS, you can segment your audience based on behavior, actions, and preferences to create more personalized email campaigns. audience segmentation.
No-Code Integration with Elementor: Using Elementor, you can easily add Klaviyo forms to your website without any coding, allowing you to quickly collect leads and grow your email list.


Step 1:
a) Log into your Klaviyo account.
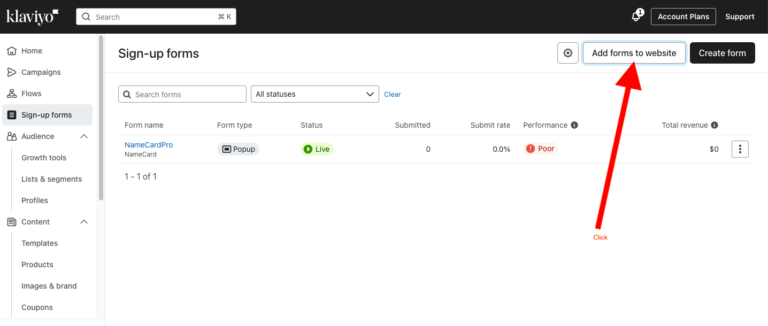
b) From the left-hand menu, click Sign-up Forms.
c) In the upper-right corner, click Add Form to Website.
Step 2
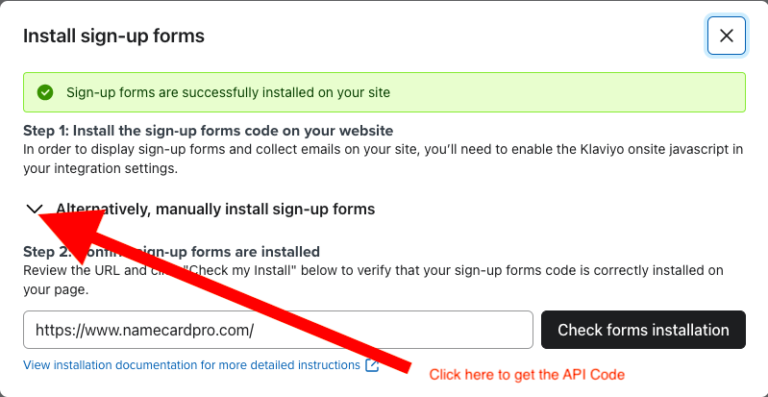
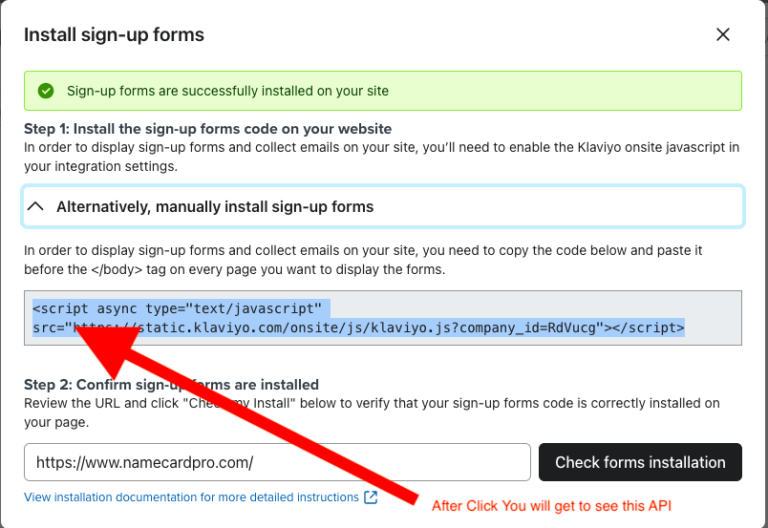
After clicking Add Form to Website, you’ll be presented with options. Click Alternatively, manually install sign-up forms. You will then see the API (HTML) code.
Step 3
Copy the code and paste it into the appropriate section of your WordPress website’s HTML or code editor.
Step 4
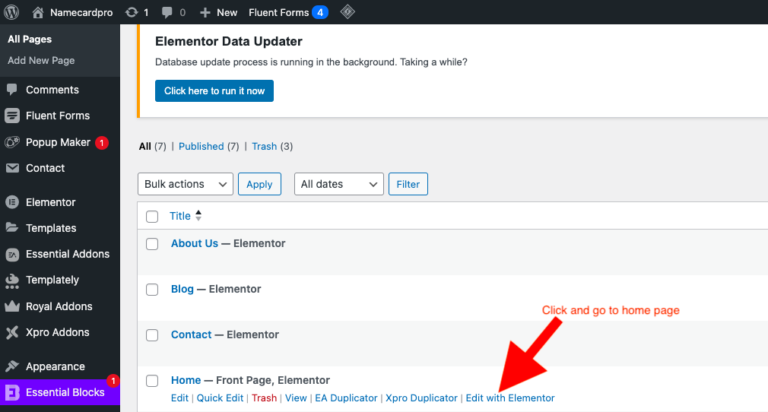
Log into the WordPress wp-admin section. Click All Pages, then navigate to your homepage and select Edit with Elementor.
Step 5
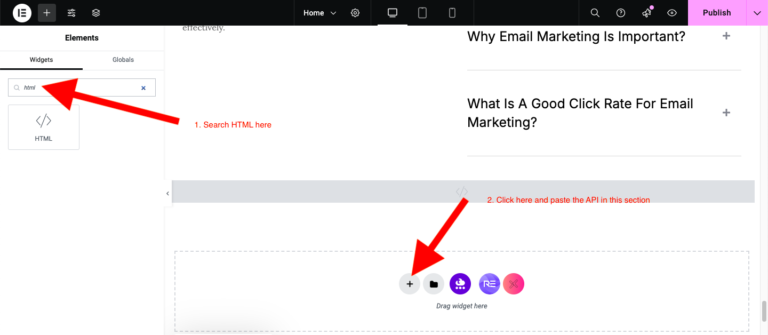
Next, scroll to the very last section of your homepage. In the Elementor widgets panel, search for HTML, then drag and drop the HTML widget into the section. Paste the code into the HTML widget. This will allow you to set up the pop-up on your WordPress website using Elementor.
Congratulations! You’ve successfully integrated Klaviyo with WordPress in just five simple steps. You can fully utilize Klaviyo’s powerful tools to automate and optimize your email marketing efforts. Whether you’re looking to grow your subscriber base or improve customer retention, Klaviyo and WordPress together offer a scalable solution for any business.
Is Klaviyo free to use?
Klaviyo offers a free plan for up to 250 contacts and 500 email sends. Paid plans offer more features.
Can I integrate Klaviyo with WooCommerce?
Yes, Klaviyo integrates seamlessly with WooCommerce, allowing you to target customers based on purchases and behavior.
What is the benefit of using Klaviyo’s API?
Using Klaviyo’s API allows for deeper customization, ensuring your site’s visitor data syncs perfectly with your email marketing.
Do I need Elementor Pro for Klaviyo integration?
No, Elementor’s free version is sufficient for embedding Klaviyo forms, although Elementor Pro offers advanced design features.
How can I test if my Klaviyo integration works?
After setting up, you can use test subscribers to ensure emails are being sent correctly and automation trigger as expected.
<script async type=”text/javascript” src=”https://static.klaviyo.com/onsite/js/klaviyo.js?company_id=RdVucg”></script>
NameCardPro Cookie Policy
At NameCardPro, we are committed to respecting your privacy. Our Privacy Policy explains how we collect and use information from and about you when you visit our website, create an account, use our services, or otherwise interact with us. This Cookie Policy provides more details on how we use cookies and similar technologies, as well as your choices regarding their use. more..